Introduction to Car Emergency Kits
Why Every Driver Needs One
Imagine this: you’re driving on a lonely highway late at night. Out of nowhere, your car sputters to a stop—battery dead. Your phone? No signal. In that moment, having a car emergency kit could be the difference between getting home safe and spending the night on the roadside. A car emergency kit isn’t just a collection of random items. It’s your backup plan, your lifeline in unexpected situations.
Having a car emergency kit is like wearing a seatbelt—you hope you never have to use it, but if you do, you’ll be glad it’s there. Roadside breakdowns, flat tires, dead batteries, and accidents don’t exactly RSVP before showing up. And when they do, the last thing you want is to be unprepared.
Think about it: cars are machines, and machines fail—often at the worst possible time. Whether you’re facing freezing winter conditions, heavy rain, or blistering heat, the dangers of being stranded without help are very real. A well-stocked emergency kit provides immediate solutions, keeps you safe, and even helps you assist others.
In many places, especially rural or remote areas, roadside assistance can take hours to arrive. That’s where your emergency kit earns its value. Instead of waiting helplessly, you could jump-start your battery, inflate a tire, or patch a minor injury with ease. And even in less dramatic cases—like a simple headlight outage—having basic tools and gear on hand can make all the difference.
So, why does every driver need an emergency kit? Because life happens—and when it does, preparedness is your best friend.
Real-Life Scenarios Where Emergency Kits Save the Day
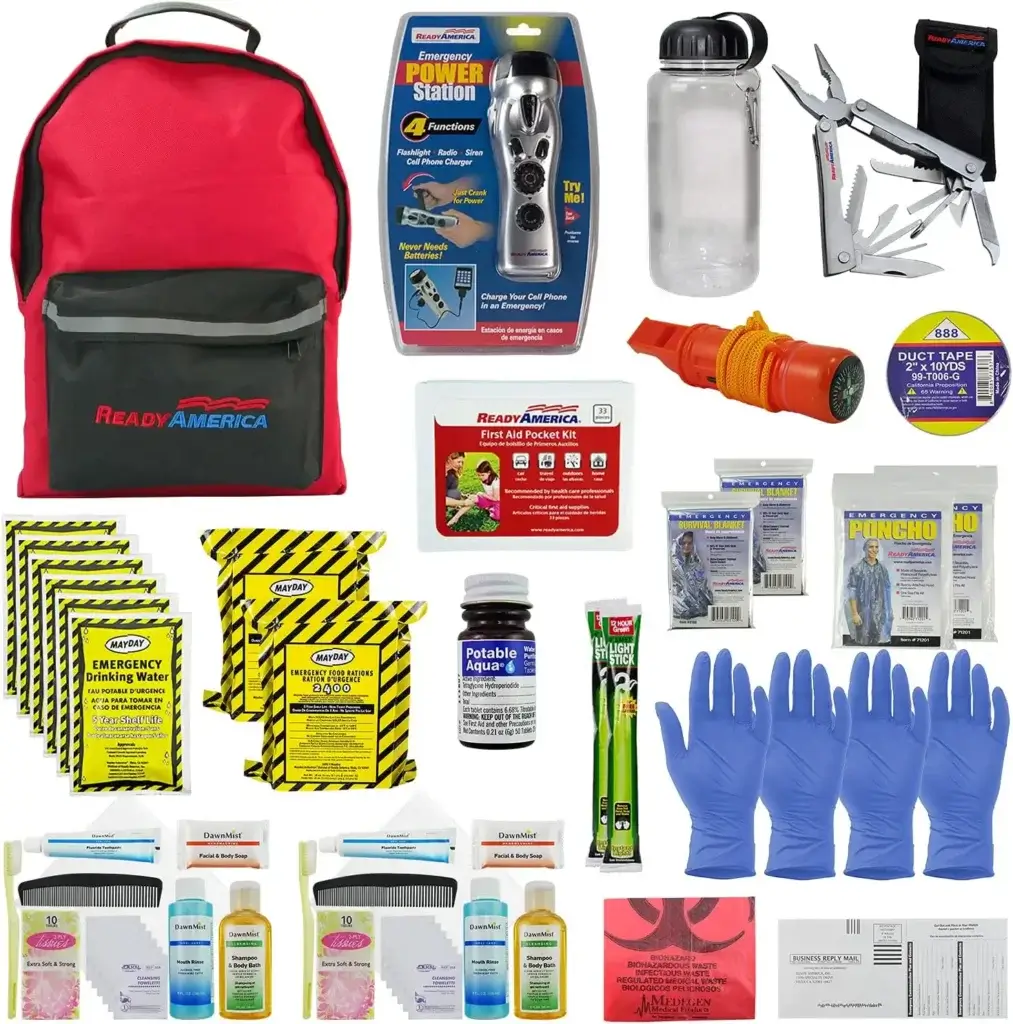
Ready America 72 Hour Deluxe Emergency Kit
Let’s talk about real drivers like you who found themselves in unexpected trouble—and how an emergency kit turned disaster into a minor inconvenience.
Case #1: It was a cold January morning when Sarah, a nurse, got off her night shift only to discover her car wouldn’t start. Her battery had died. With no jumper cables or nearby help, she waited nearly two hours for roadside assistance. After that, she never left home without a jumper cable and emergency blanket in her trunk.
Case #2: Mike and his two kids were driving through a national park when a rock punctured one of his tires. No signal, no service—but luckily, his kit had a tire inflator and sealant. He patched the hole, reinflated the tire, and was back on the road in 30 minutes.
Case #3: Lisa was stuck in traffic when a freak hailstorm hit. With visibility nearly zero and temperatures dropping fast, she pulled over and wrapped herself in a thermal blanket from her kit, waited safely until the storm passed, and then continued home.
These stories aren’t exceptions—they’re examples. Emergency kits are not just for mechanics or survivalists. They’re for everyday people dealing with everyday problems. And when the unexpected strikes, they give you the tools and confidence to take control of the situation.
Essentials of a Car Emergency Kit
Must-Have Items for Safety and Survival
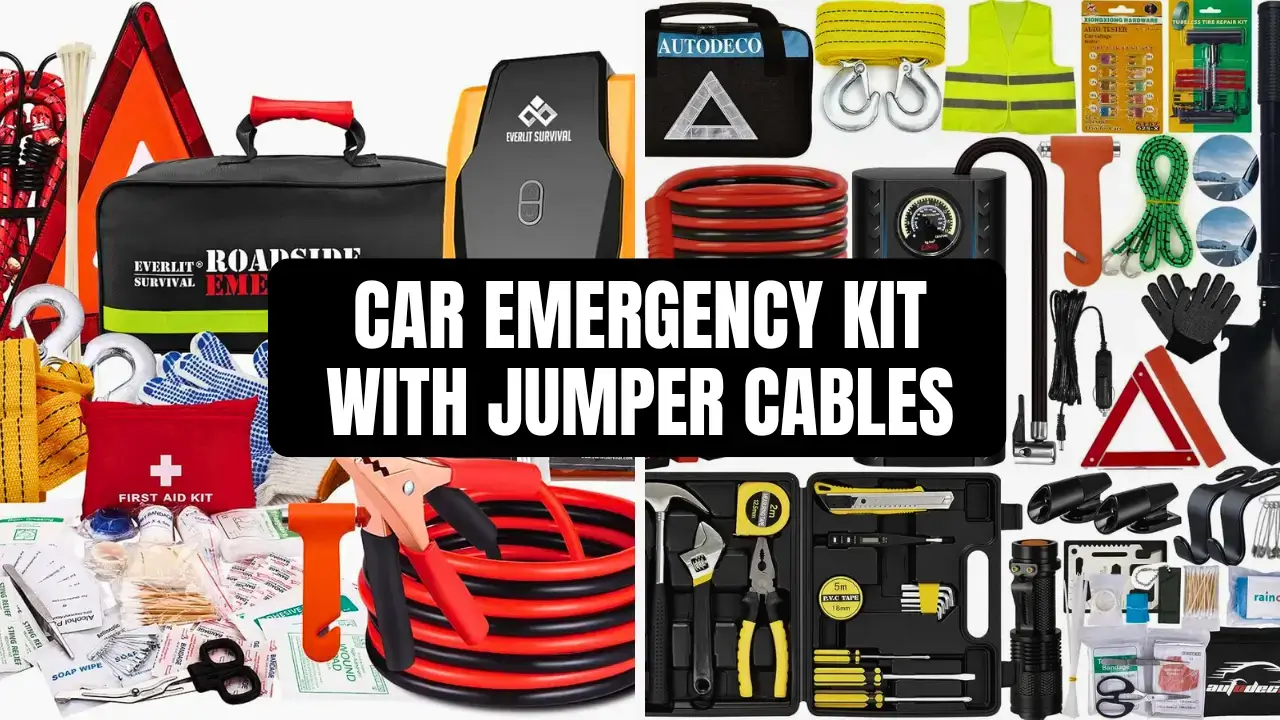
Let’s break down what goes into a rock-solid car emergency kit. First off, not all emergencies are mechanical—some are medical, weather-related, or even safety-based. So your kit needs to cover several categories: mechanical issues, health, comfort, visibility, and communication.
Here’s a list of absolute must-haves:
- Jumper Cables: To revive a dead battery—an essential, not optional.
- Tire Inflator and Sealant: Temporary fix for flat tires.
- Flashlight with Extra Batteries: Because car issues love to strike at night.
- Reflective Warning Triangle and High-Visibility Vest: Keep you safe and seen on the road.
- First Aid Kit: For minor injuries like cuts, scrapes, and burns.
- Multi-Tool or Basic Toolkit: Think screwdrivers, wrenches, pliers—tools to perform minor fixes.
- Emergency Blanket: Insulation from cold if stranded in winter.
- Bottled Water and Non-Perishable Snacks: Hydration and energy in case you’re stuck for hours.
- Phone Charger or Power Bank: A dead phone is worse than a dead battery.
- Duct Tape and Zip Ties: For temporary fixes on hoses, bumpers, and more.
These are your survival basics. They can help you weather the storm—literally and figuratively—until professional help arrives or you get back on the road.
And remember: the best emergency kits aren’t the most expensive ones. They’re the most complete and organized.
Optional Add-Ons Based on Climate and Location
Depending on where you live or drive most often, you might want to beef up your kit with specialized items. A driver in Arizona’s scorching deserts has different needs than someone trekking through Alaska’s icy roads. Here are some smart climate-based additions:
For Cold Climates:
- Ice scraper and snow brush
- Tow strap or rope
- Extra warm clothing and gloves
- Bag of sand or cat litter (for traction on icy roads)
- Portable shovel
For Hot or Desert Regions:
- Extra water (at least a gallon)
- Cooling towel or spray
- Sunshade or tarp
- Electrolyte tablets or sports drinks
For Remote or Off-Grid Travel:
- GPS device or detailed paper maps
- Satellite phone or two-way radio
- Firestarter or waterproof matches
- Extra fuel canister (approved and safely stored)
For Urban Drivers:
- Spare fuses and bulbs
- Crowbar or glass breaker (urban collisions or car lockouts)
- Pepper spray (where legal)
The beauty of customizing your kit is that it becomes YOUR emergency kit. It’s tailored to your route, your car, and your life. When in doubt, ask yourself, “If I got stuck here for 6 hours, what would I need to stay safe and sane?”
Spotlight on Jumper Cables
Why Jumper Cables Are Non-Negotiable
Out of everything you put in your emergency kit, jumper cables might just be the MVP. Why? Because a dead battery is one of the most common car problems—and it can hit at any time. Cold weather, leaving your lights on, an old battery, or simply bad luck can leave your car completely powerless.
With a good pair of jumper cables, you’re no longer at the mercy of a tow truck or a passing stranger with tools. You’re empowered to fix one of the most common car issues in minutes—saving time, money, and frustration.
Let’s be honest: the feeling of hearing click…click instead of an engine roar is panic-inducing. But when you’ve got jumper cables, that panic turns into action. Pair up with a friendly motorist, follow a few steps (more on that soon), and you’re good to go.
A reliable set of jumper cables is a one-time investment that could save you from multiple headaches. And they don’t take up much space—just coil them up and tuck them into your emergency kit or under a seat.
Even better? They make you the hero on the road. You’re not just fixing your own car—you could help a fellow stranded driver, earning you some serious good karma.
How to Choose the Right Jumper Cables
Not all jumper cables are created equal. Cheap cables can actually be dangerous—or completely useless when you need them most. Here’s what to look for:
- Gauge Rating: This is the thickness of the cable. The lower the number, the thicker the cable. For most cars, go for 4 or 6-gauge cables. For trucks and SUVs, consider 2-gauge.
- Length: Get at least 12 feet of cable, but 16–20 feet gives you more flexibility in tight spots.
- Clamp Quality: Look for copper-plated or solid copper clamps. Plastic clamps tend to break easily and don’t conduct electricity well.
- Insulation: Thick, heavy-duty insulation protects against heat, cracking, and wear. You want cables that feel sturdy—not flimsy.
- Tangle-Free Storage: Some come with storage bags or tangle-resistant designs. You’ll thank yourself later.
Brand matters too. Trust names like Cartman, Energizer, or EPAuto—they’re known for quality and durability. A solid set will run you $20 to $40, but that’s a small price for peace of mind.
Step-by-Step Guide to Using Jumper Cables Safely
Common Mistakes to Avoid
Jump-starting a car may seem straightforward, but one wrong move can lead to sparks, damage, or even injury. The most common mistake? Reversing the polarity. Connecting the cables to the wrong terminals can fry your car’s electrical system or even cause the battery to explode.
Here are a few missteps to avoid:
- Mixing Up Positive and Negative Terminals
The red clamp goes on positive (+), and the black on negative (−). Always double-check before connecting. Even one reversed connection can cause a dangerous surge. - Letting the Clamps Touch
While connected to a power source, the metal clamps must never touch each other. This can cause a short circuit and major damage. - Jumping a Damaged Battery
If your battery is cracked, leaking, or swollen—do not attempt to jump-start it. It could be a ticking time bomb. In that case, call for professional help. - Using Rusty or Dirty Terminals
Dirty battery terminals can interfere with the connection. Clean them off with a rag or a wire brush if you have one. - Trying to Jump with a Weak Donor Vehicle
Don’t expect a motorcycle or a tiny compact car to jump-start your pickup truck. Make sure the donor car has a similar or greater battery power capacity. - Not Letting the Jumped Car Charge Enough
After the engine starts, let it run for at least 10–15 minutes to recharge the battery. Otherwise, the same problem could return the next time you turn off the engine.
Avoiding these errors ensures a safe and successful jump-start. The process isn’t rocket science, but treating it carelessly can lead to serious consequences.
Safety Tips for Jump-Starting Your Vehicle
Let’s walk through how to use jumper cables like a pro—safely and effectively. Whether you’re the one giving or receiving the jump, this step-by-step guide has your back:
Step 1: Park the Cars Properly
Park both vehicles nose-to-nose (or side-by-side if cables are long enough), and turn off the ignition. Engage both parking brakes.
Step 2: Locate the Batteries and Terminals
Pop the hoods and find the batteries. Locate the positive (+) and negative (−) terminals.
Step 3: Connect the Jumper Cables in This Exact Order:
- Red to Dead: Connect the red clamp to the positive terminal of the dead battery.
- Red to Donor: Connect the other red clamp to the positive terminal of the working battery.
- Black to Donor: Connect one black clamp to the negative terminal of the working battery.
- Black to Ground: Connect the final black clamp to an unpainted metal surface on the engine block or car frame of the dead car (not the battery itself) to prevent sparking.
Step 4: Start the Working Vehicle
Let it run for a few minutes to transfer charge.
Step 5: Try Starting the Dead Vehicle
If it starts, let both cars idle for 5–10 minutes.
Step 6: Disconnect in Reverse Order
Remove the clamps in this order: black from grounded metal, black from donor battery, red from donor, red from revived car.
Step 7: Drive or Idle to Recharge
Keep the engine running for at least 15 minutes or take a short drive to allow the alternator to recharge the battery.
Bonus Tips:
- Carry gloves to avoid burns or grime.
- Don’t smoke near the battery—hydrogen gas can ignite.
- If the car doesn’t start after a few tries, don’t keep cranking the engine. You could damage the starter.
Proper use of jumper cables not only gets your car back on the road—it also ensures you don’t do more harm than good.
Best Practices for Storing Your Emergency Kit
Where to Keep It in Your Vehicle
Storing your emergency kit in the right place is just as important as having one in the first place. After all, what good is a kit if you can’t reach it when you need it most?
Ideal Storage Spots:
- Trunk: This is the most common and spacious spot. Use a plastic bin or duffel bag to keep everything organized.
- Under Seat Compartments: Great for smaller kits or for storing frequently used items like a flashlight or gloves.
- Backseat Pocket Organizers: Perfect for road trip essentials, maps, and first-aid items.
- Roof Boxes (if applicable): For bulky seasonal gear, especially if you’re traveling with a full car.
Storage Tips:
- Keep items secure: A hard stop shouldn’t send your kit flying. Use velcro straps or netting.
- Label compartments: Know exactly where jumper cables, snacks, or medical items are without digging.
- Use a waterproof container: Especially important in wet or snowy climates to avoid mold or rust.
Quick-access items like seatbelt cutters, window breakers, or flashlights should always be within reach from the driver’s seat. Store those in your glovebox or center console.
Lastly, don’t bury your kit under grocery bags, luggage, or gym gear. You want to grab it fast—not play car Jenga when time is critical.
Maintenance and Regular Check-Ups
Like any safety system, your emergency kit needs occasional TLC. Batteries drain, snacks expire, tools get misplaced, and weather takes its toll. A neglected kit is a useless kit.
Here’s a maintenance schedule to keep you on track:
Monthly:
- Check flashlight batteries and charge power banks.
- Inspect jumper cables for corrosion or wear.
- Restock any used items (band-aids, pain relievers, water).
Every 3 Months:
- Rotate food and water stock.
- Verify tire inflators, sealants, or flares haven’t expired.
- Make sure emergency contact numbers are current.
Before Long Trips:
- Do a full inventory.
- Add specific items like extra food, baby supplies, or pet gear.
- Print paper maps for areas with poor reception.
Seasonally:
- Swap gear based on weather (thermal blankets in winter, sunscreen in summer).
- Inspect and clean the kit container to prevent mold or insect issues.
A 10-minute check every few weeks is a small price to pay for something that could save your life.
Tailoring Your Emergency Kit for Different Seasons
Winter-Specific Essentials
Winter driving can be brutal—icy roads, snowstorms, and frigid temperatures don’t play fair. Your emergency kit needs to rise to the challenge.
Here’s what to add for cold-weather preparedness:
- Heavy-Duty Ice Scraper and Snow Brush: You’ll need to clear your windshield and mirrors quickly.
- Thermal Blanket or Sleeping Bag: If you’re stranded in subzero temps, staying warm is critical.
- Hand and Foot Warmers: These little packets can be lifesavers for circulation and comfort.
- Portable Shovel: Digging your tires out of snowbanks is a lot easier with the right tool.
- Traction Aids: A bag of kitty litter, sand, or traction mats can help your tires grip on ice.
- Winter Clothing: Extra hats, gloves, scarves, and socks keep extremities warm if you’re stuck.
- Antifreeze and Windshield Washer Fluid: Top off fluids before you hit the road.
- Tow Strap or Chain: Helps if you need to be pulled out of a ditch.
And don’t forget a small candle and metal container—a single lit candle can raise the temperature inside your vehicle by several degrees.
Even if you’re just commuting to work, the weather can turn fast. Prepare like you’re going on a winter camping trip—because in an emergency, that’s what it might feel like.
Summer Gear You Shouldn’t Forget
Just because the sun is out doesn’t mean you can skip your emergency kit. In fact, hot weather introduces its own set of dangers. Overheating, dehydration, and vehicle stress are all common summer hazards that can leave you stranded.
Here’s what to pack for summer-specific safety:
- Extra Water Bottles: Dehydration can set in quickly, especially if you’re stuck in a car without air conditioning. Carry at least 1 gallon per person.
- Electrolyte Tablets or Sports Drinks: These help replace salts lost from sweating and can prevent heat exhaustion.
- Cooling Towels or Misting Fans: Soak and snap a towel around your neck or use a battery-powered misting fan to bring your temperature down.
- Sunshade or Reflective Windshield Cover: Keeps your car’s interior cooler and prevents seatbelt or steering wheel burns.
- Sunscreen and Bug Spray: Long exposure to the sun or a mosquito-filled ditch? Be ready.
- UV-Protective Sunglasses and Hat: Keep your visibility sharp and reduce sunstroke risk.
- Spare Engine Coolant and Radiator Hose Tape: Overheated engines are a summer classic. Be prepared to cool down your ride.
Also, don’t forget about your pets. If they’re traveling with you, pack:
- A collapsible water bowl
- Cooling mats
- Extra pet food
Extreme heat can be just as dangerous as ice storms. Think of your summer emergency kit as your portable shade, hydration station, and first-aid center—all rolled into one.
Pre-Assembled vs DIY Emergency Kits
Pros and Cons of Buying a Kit
Pre-assembled emergency kits are appealing for one big reason: convenience. You buy it, stash it in your car, and boom—you’re ready for emergencies. But is it always the best option? Let’s weigh the pros and cons.
Pros:
- Time-Saving: No need to hunt down individual items. It’s a grab-and-go solution.
- Professionally Curated: Often includes items you might forget or not think of.
- Compact & Organized: Usually comes in a neat bag with labeled compartments.
Cons:
- Generic Contents: What works for someone in Florida might not cut it in Alaska.
- Lower Quality Gear: Some kits include flimsy jumper cables or poor-quality tools just to fill space.
- Limited Customization: Want to add a pet first-aid kit or special medication? You’ll probably need to supplement anyway.
The best pre-assembled kits come from reputable brands and offer room for customization. Brands like Lifeline, AAA, and Everlit make solid kits with decent gear—but always read reviews and inspect what’s inside before relying on them.
Building Your Own for Customization and Cost-Saving
Now let’s talk about DIY car emergency kits. Building your own takes more effort, but the rewards are worth it.
Benefits of DIY Kits:
- Personalized: You choose the exact gear that suits your car, your climate, and your needs.
- Better Quality Control: Hand-pick brands and tools that are reliable, not just cheap.
- Expandable: Start with basics and build over time without feeling overwhelmed.
Tips for Building Your Kit:
- Start with the “must-haves” (jumper cables, flashlight, first-aid kit, etc.).
- Add tools and gear specific to your local weather.
- Use clear plastic bins or soft-sided bags with compartments for easy access.
- Don’t forget comfort items: a blanket, snacks, water, and phone chargers.
Budget tip: You can often find high-quality tools second-hand or on sale, and stores like Harbor Freight, Walmart, or Amazon have cost-effective options if you shop smart.
Bottom line? A DIY kit may take a weekend to assemble, but it’ll fit your life like a glove—and likely perform better when it counts.
Budget-Friendly Car Emergency Kit Options
High-Quality, Low-Cost Alternatives
Staying safe on the road shouldn’t cost a fortune. You can build a reliable emergency kit without breaking the bank. Here’s how to stretch your dollars while packing smart:
Budget Starter List:
- Jumper Cables (4-gauge, 12 ft) – $15–$25, view now amazon
- LED Flashlight with Batteries – $8–$12, View at amazon
- Basic First Aid Kit – $10–$15, View at amazon
- Reflective Triangle or Vest – $5–$10, View at amazon
- Multipurpose Tool (like a Swiss Army Knife) – $10–$20, View at amazon
- Duct Tape and Zip Ties Combo – $5, View at amazon
- Emergency Blanket – $2, View at amazon
- Bottled Water and Granola Bars – $5, View at amazon
- Plastic Bin for Storage – $5–$10, View at amazon
Total? Around $80 or less for a functional kit.
Where to Shop on a Budget:
- Dollar Stores: Great for items like gloves, snacks, and basic medical supplies.
- Walmart/Target: Reasonably priced tools, jumper cables, and automotive gear.
- Amazon: Convenient for bundle deals and pre-assembled kits.
- Local Auto Shops: Don’t overlook clearance sections or seasonal deals.
Bonus Tip: Keep an eye on online deals. Major retailers run sales around holidays like Memorial Day, Labor Day, and Black Friday, perfect for snagging quality gear at discounted prices.
Being prepared doesn’t mean maxing out your credit card—it means shopping smart and thinking ahead.
Where to Shop and What to Look For
Finding the right items at the right price comes down to knowing where to look. Here are top places and what they’re best for:
| Store | Best For | Notes |
|---|---|---|
| Amazon | Jumper cables, full kits, gadgets | Read reviews carefully |
| Walmart | Budget tools, basic medical kits | In-store options vary |
| AutoZone/O’Reilly | High-quality automotive gear | Prices can be higher |
| REI/Bass Pro Shops | Outdoor survival gear | Great for remote-area kits |
| Harbor Freight | Tools and car essentials | Frequent coupons and sales |
| Target | General supplies, snack items | Great for family kits |
When shopping, always look for:
- Warranty or return policies
- User reviews and ratings
- Kit contents list (so you know what you’re getting)
Also, don’t overlook local hardware stores—they often carry rugged tools and helpful gear you won’t find in big-box stores.
Top Brands and Products to Consider
Recommended Jumper Cable Brands
Not all jumper cables are built alike. Some are too short. Others can barely handle a sedan’s battery, let alone a truck’s. For durability, safety, and performance, go with trusted names.
Top-Rated Jumper Cable Brands:
- Cartman Booster Cables
- 4-gauge, 20 ft, great insulation
- Ideal for trucks and SUVs
- Energizer Jumper Cables
- 2-gauge available, heavy-duty, tangle-free
- Comes with a storage bag
- EPAuto Heavy Duty Jumper Cables
- Budget-friendly and compact
- Suitable for sedans and smaller vehicles
- Iron Forge Tools Jumper Cables
- 25 ft long, great for tight parking situations
- Copper-clad aluminum for durability
- TOPDC Jumper Cables
- Industrial-grade with thick clamps
- Designed for all weather use
When choosing a cable, always read user reviews and avoid the ultra-cheap no-name brands. Your car’s battery is too important to trust to bargain-bin tools.
Best Comprehensive Emergency Kits on the Market
When you’re short on time or just want a plug-and-play solution, pre-packed emergency kits can be a life-saver—literally. But not all are created equal. Some are loaded with fluff, while others pack real value into every item.
Here are a few standout options you can count on:
1. Lifeline AAA Premium Road Kit
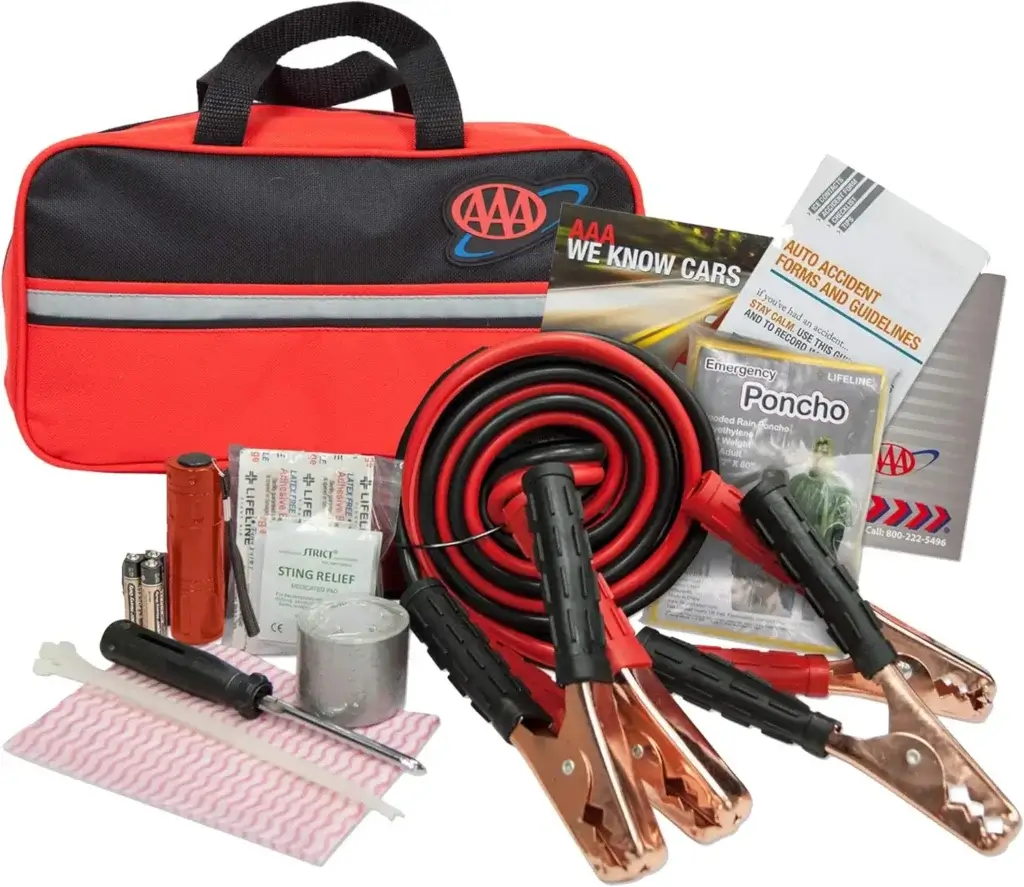
Lifeline AAA Premium Road Kit
- Includes: 42 essential items—jumper cables, first-aid kit, flashlight, and more.
- Best for: General drivers looking for a balanced, branded kit.
- Price: Around $45–$60
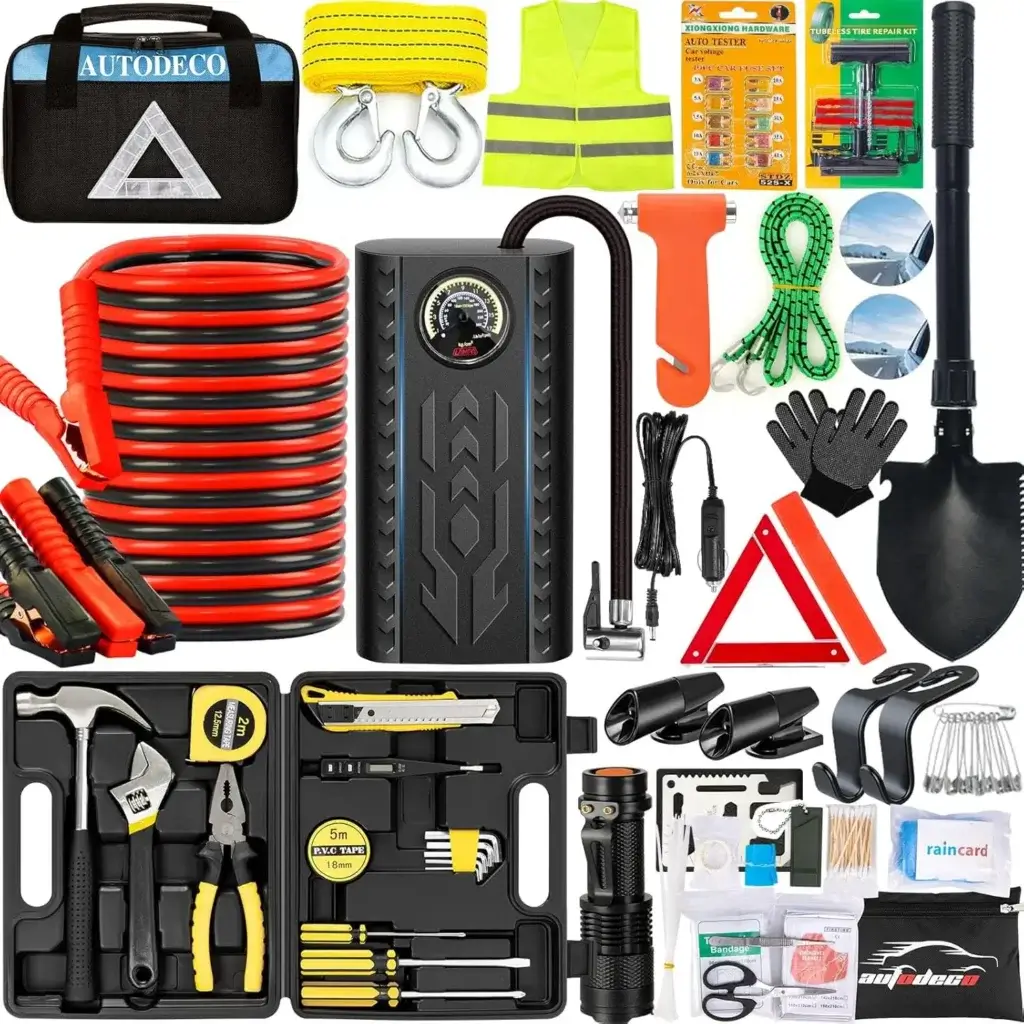
2. Everlit Survival Car Emergency Kit
Everlit Survival Car Emergency Kit
- Includes: Military-style survival gear, trauma kit, jumper cables, multi-tool.
- Best for: Off-roaders and adventure seekers.
- Price: $60–$80
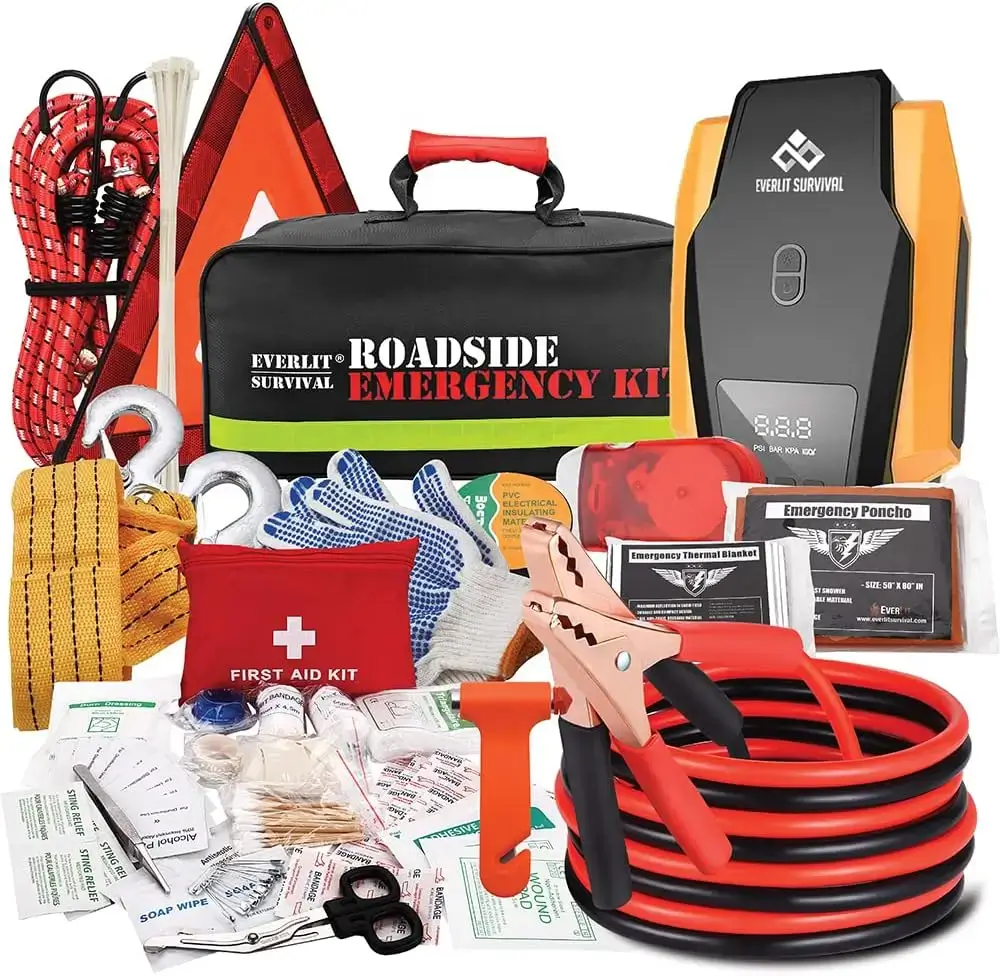
3. Thrive Roadside Assistance Kit
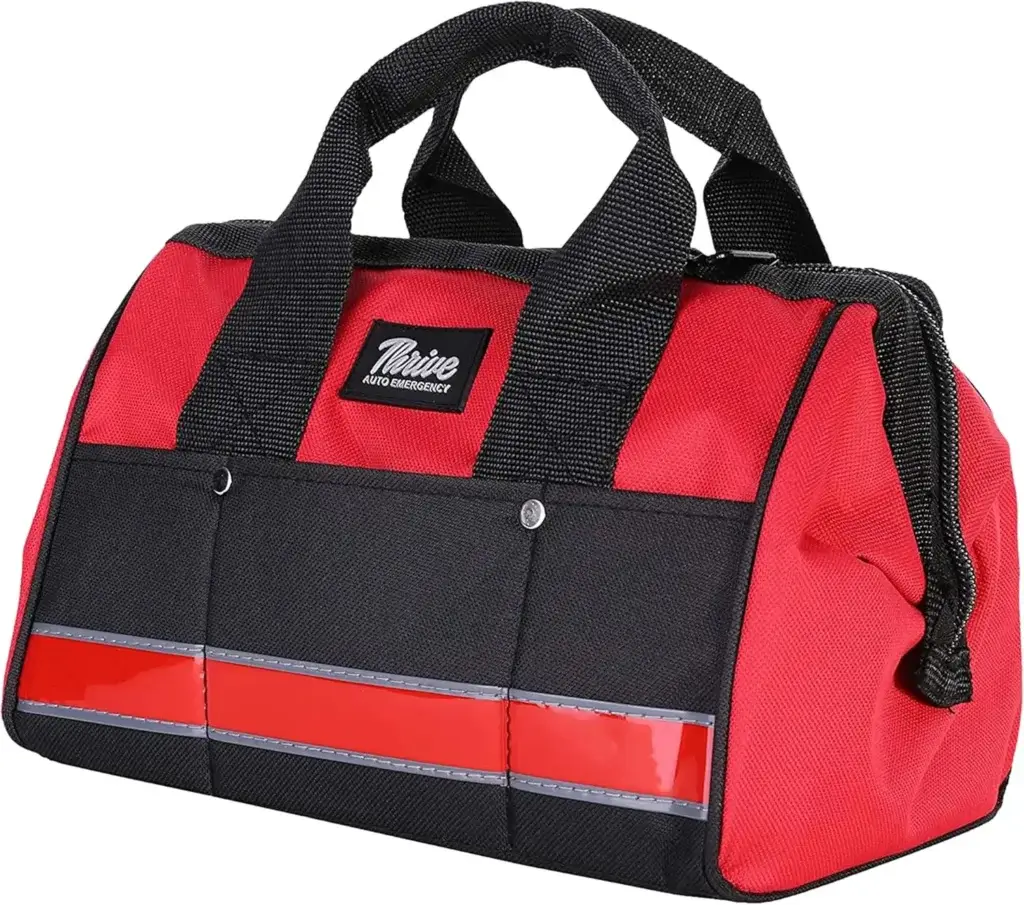
Thrive Roadside Assistance Kit
- Includes: Heavy-duty jumper cables, warning triangle, tow strap, gloves.
- Best for: Urban and highway driving.
- Price: $40–$55
4. First Secure Car Emergency Kit
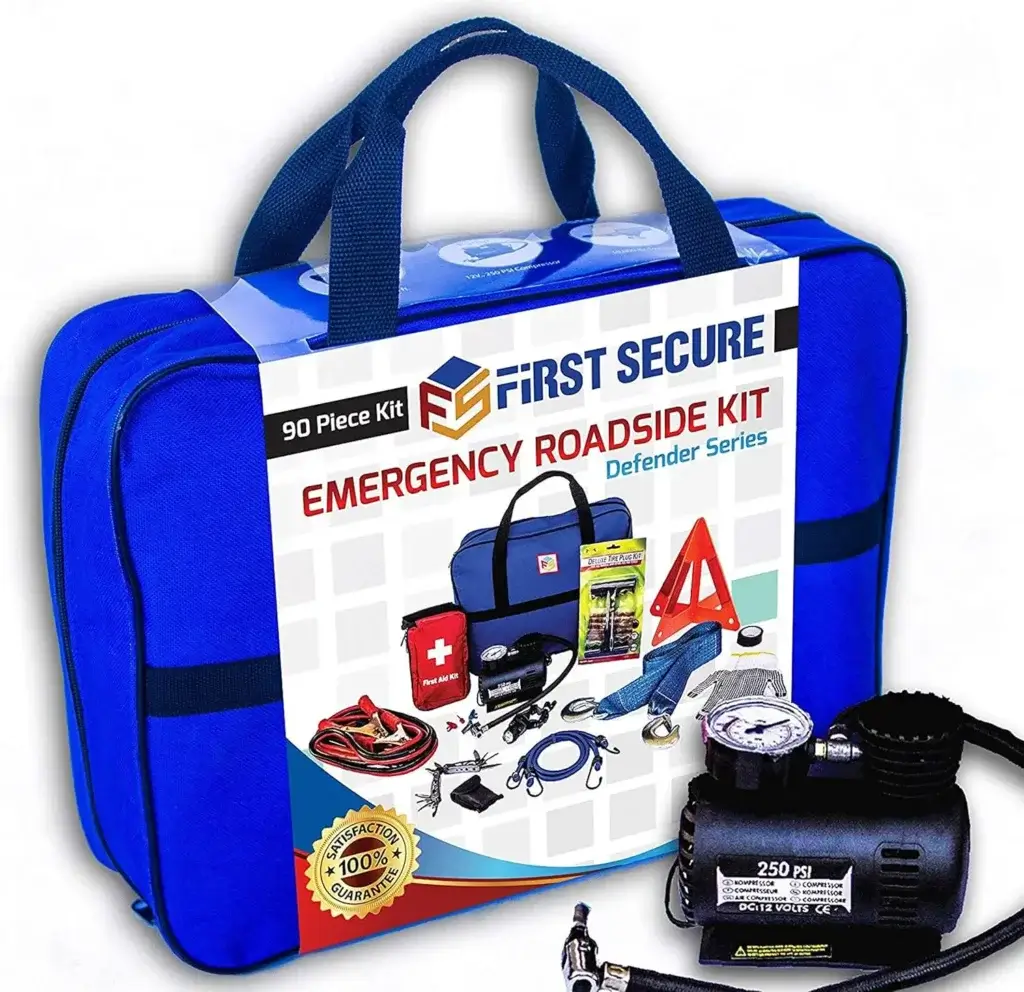
Lifeline AAA Premium Road Kit
- Includes: High-capacity power bank, jumper cables, tire inflator, air compressor.
- Best for: Tech-savvy drivers or those in remote areas.
- Price: $80–$100
5. Roadside Rescue Emergency Assistance Kit
Roadside Rescue Emergency Assistance Kit
- Includes: 110+ pieces including tools, poncho, reflective vest, jumper cables.
- Best for: Families or group drivers.
- Price: $50–$70
When choosing a full kit, look for:
- Heavy-duty cables (at least 4-gauge)
- Real tools, not cheap plastic ones
- Storage case that keeps everything organized
- Brand warranty or satisfaction guarantee
Investing in a quality kit ensures peace of mind and quick solutions when you need them most.
Emergency Kits for Families vs Solo Drivers
Packing for Kids, Pets, and Multiple Passengers
Family road trips can turn into chaotic messes if an emergency arises. When you’re traveling with kids or pets, your kit needs more than jumper cables and a flashlight.
For Kids:
- Diapers and wipes (even if potty trained)
- Small toys or coloring books (to keep them calm)
- Child-safe snacks and drinks
- Child medications (fever reducers, allergy meds)
For Pets:
- Collapsible food and water bowls
- Extra food and leash
- Pet first-aid basics (tick remover, styptic powder)
- Pet blanket or carrier
For Everyone:
- Multiple blankets or emergency sleeping bags
- Extra water (at least 1 gallon per person/pet)
- Entertainment: Books, games, or chargers for electronics
- Portable toilet or urinal (great for kids and emergencies)
When packing for a family, think in terms of comfort, sanity, and safety. One emergency kit won’t be enough. Supplement it with a “family essentials” bag you can grab quickly.
Streamlining for Single Commuters
If you’re a solo driver or commuter, your kit should focus on efficiency and mobility. You don’t need five blankets or a pet bowl—but you do need quality tools, food, and power backup.
Single-driver essentials:
- Compact jumper cables and tire inflator
- Protein bars and small water bottles
- Power bank or solar charger
- Pepper spray (where legal)
- Cash (for tolls, emergencies, etc.)
- Local map and emergency contacts list
A single-driver kit should fit into a small duffel or hard case and be easy to move between vehicles if you drive a work car or use rentals often.
First Aid Essentials in a Car Emergency Kit
What to Include for Minor Injuries
Medical emergencies happen fast—and often far from help. Your first-aid kit should be equipped to handle everything from scrapes to burns to more serious injuries.
Basic First-Aid Supplies:
- Adhesive bandages (multiple sizes)
- Sterile gauze pads and medical tape
- Antiseptic wipes and antibiotic ointment
- Tweezers and small scissors
- Pain relievers (ibuprofen, acetaminophen)
- Burn cream and cold compress
- Hydrocortisone cream for insect bites or rashes
Advanced Items (for remote or long trips):
- Emergency tourniquet
- CPR face shield
- Splint or finger brace
- Emergency whistle and signaling mirror
Also include:
- List of emergency contacts
- Personal medical info (allergies, medications)
- Any prescription meds (at least a 24–48 hour supply)
Regularly check your kit for expired meds or dried-out bandages. A clean, sealed, and replenished first-aid kit is one of the smartest safety tools you’ll ever own.
How to Keep Medical Supplies Fresh and Functional
Medical items degrade over time. Heat, moisture, and movement all reduce their effectiveness. Here’s how to keep your kit reliable:
- Use a waterproof pouch for medicine and wipes.
- Label expiry dates with a marker so you can spot them at a glance.
- Rotate meds and creams every 6 months.
- Avoid extreme heat: store meds inside the car cabin instead of the trunk in hot climates.
- Use vacuum-sealed packs if available—they last longer and resist moisture.
Nothing’s worse than opening your first-aid kit and finding crumbled pills or moldy bandages. A little maintenance goes a long way.
Communication and Navigation Tools
When Your Phone Dies – What to Use Instead
Let’s say your phone battery is gone. No signal. No GPS. Now what?
Here’s what to rely on when modern tech fails:
- Paper Road Atlas: Yes, they still exist—and they never crash.
- Local Area Maps: Great for national parks or rural areas.
- Battery-Powered AM/FM Radio: To get emergency broadcasts.
- Hand-crank flashlight/radio combos: No batteries required.
- Whistle or flares: For signaling if stranded or injured.
- Mirror or reflective card: Useful to catch a rescuer’s eye from a distance.
Also consider a satellite communicator like a Garmin InReach or Spot device if you travel off-grid often.
Maps, Radios, and Other Lifesavers
Navigation tools are crucial during emergencies—but most people forget them. Add these low-tech lifesavers to your kit:
- Compass: Works without batteries and helps you stay oriented.
- Pre-downloaded offline maps on your smartphone (Google Maps offers this).
- Laminated contact card with emergency numbers, insurance info, and blood type.
In an age of digital everything, the analog stuff still saves lives. Don’t ignore it.
Real Customer Stories and Testimonials
How a Simple Kit Changed the Outcome
“I bought a basic emergency kit on Amazon, not thinking I’d ever use it,” said Brian, a commuter in Michigan. “Three months later, I blew a tire on a snowy backroad. No signal, no help. But I had a mini shovel and thermal blanket. I dug myself out and stayed warm till help arrived.”
Tanya from Nevada shares: “My battery died in a parking lot at midnight. Thankfully, I had jumper cables—and a random guy with a running car. I was back on the road in 10 minutes.”
Real people. Real emergencies. Real solutions. These stories reinforce one point: it’s not a matter of if you’ll need your kit—it’s when.
Lessons Learned from Emergency Situations
Drivers often say, “I wish I’d added XYZ.” Common regrets include:
- Forgetting extra water
- Skipping jumper cables
- Not packing warm clothes
- Missing flashlight batteries
The lesson? Don’t just build a kit. Test it. Practice using it. And make sure it evolves with your life and driving habits.
Creating a Checklist and Keeping It Updated
Monthly and Seasonal Checks
Checklists keep your kit ready and reliable. Use this basic monthly review:
- ✅ Flashlight works
- ✅ Jumper cables clean and untangled
- ✅ Food/snacks not expired
- ✅ First-aid kit stocked
- ✅ Batteries charged
- ✅ Power bank full
- ✅ Fluids topped off (coolant, washer fluid)
- ✅ Tires inflated (use a portable gauge)
Each season, add/remove climate-related items and make sure nothing is damaged or missing.
Printable PDF or App Suggestions
Want a checklist that’s always handy? Here are great tools:
- Apps:
- “PackPoint”
- “Checklist+”
- “Evernote”
- Printable PDFs:
- Ready.gov car kit checklist
- FEMA Emergency Supply List
- AAA Road Trip Essentials PDF
Laminate your list and stash it in your glovebox—or go digital and set reminders in your calendar app.
Conclusion
A car emergency kit with jumper cables isn’t just for doomsday preppers or long-haul truckers—it’s for you. The parent. The commuter. The road-tripper. The weekend warrior. It’s your ticket to peace of mind every time you hit the road.
Building the right kit takes a bit of time and planning, but it’s a small effort with huge payoffs. Whether you DIY it or buy a pre-packed one, make sure your kit includes quality jumper cables, seasonal items, first aid, and navigation tools.
And remember: it’s not about if you’ll need it—but when.
FAQs
1. What size jumper cables do I need for an SUV or truck?
You’ll need 2 or 4-gauge cables that are at least 20 feet long. Thicker cables carry more current and ensure a safe, effective jump.
2. Can jumper cables damage a vehicle if used incorrectly?
Yes. Connecting cables to the wrong terminals or jumping a damaged battery can cause electrical surges or even fires.
3. How long can a car emergency kit last in the trunk?
With proper storage and maintenance, a kit can last years. Just rotate perishables and check batteries every 3–6 months.
4. What’s the most forgotten item in emergency kits?
Water. People often pack snacks and tools but forget hydration. Always keep bottled water or a purifier in your kit.
5. Are car emergency kits mandatory in any state?
No U.S. states mandate them by law, but several recommend them strongly—especially in extreme weather zones or mountainous regions.